DID YOU KNOW…
Manufacturers such as Norris, Stanley, Joh. Weiss & Sohn and Edward Preston have been featured on the site, along with retailers catalogs from Buck & Hickman, Hammacher Schlemmer and Tyzack & Son.
Shooting Boards And Donkey’s Ears – Appliances Used With Planes
The following article first appeared in the British magazine ‘The Woodworker’ in December, 1939. It was part of a series of articles which would run throughout the rest of that year and into 1940. Part 6 focused on shooting boards and other appliances used with planes.
Although the information contained in this article is beneficial to both the beginner woodworker and the more advanced craftsman, it is merely an introduction to some of the aids and devices which can be very useful when working with hand planes. As with the earlier articles, readers who are just starting out with woodworking may find this one of worthwhile benefit.
What To Know About Tools
Appliances Used With Planes
By Craftsman.
There are many useful additions to the tool kit that the reader can make up for himself. The shooting board, the use of which is described here, is one of them. Details of other equally handy items will appear next month.
In the ordinary way the plane needs no special appliance in its use; an experienced craftsman can manipulate it with perfect success. There are occasions, however, when the use of a specially designed appliance is not only an advantage, but may even be essential. In any case, it will invariably save a great deal of time.
SHOOTING BOARDS
Perhaps the most obvious of these is the shooting board. It is used for two distinct purposes. The first is in trimming the end of a piece of timber in which it is required that the work must be square in both directions, width and thickness. The second is in planing the edge of a long side in which the edge must be made straight in its length and square in its thickness. I mention these as two distinct uses chiefly because the manipulation of the plane is rather different in the one case from that in the other.
First, however, a word about the shooting board itself. There are many sizes in which it can be usefully made, and the serious woodworker is advised to set himself up with two at the first convenient opportunity. The one might be, say, 2 ft. long, and the other 5 to 6 ft. (The exact size does not matter). The small one is used for trimming the ends of timber and for small work generally, whilst the other comes in for long edges.
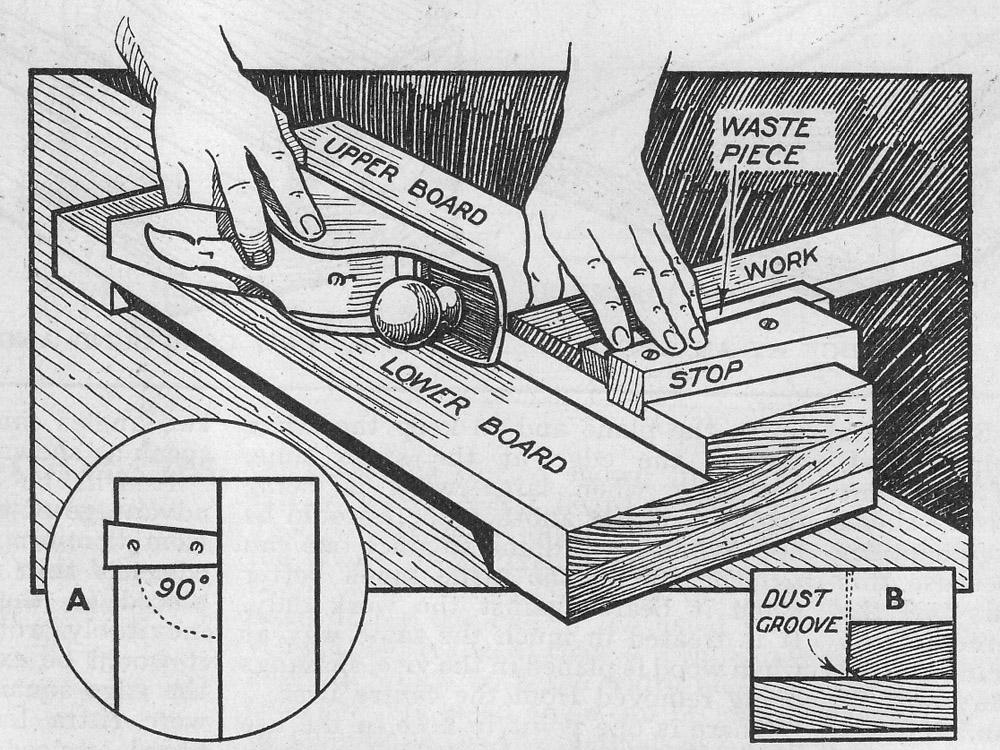
Note that the lower corner of the upper board is placed away at a slight angle as at B. If this were not provided the dust collecting in the angle might cause the plane to work out of truth.
Fig. 1 shows the general construction. It needs to be fairly heavily built — even the small one — because it receives a considerable amount of jolting, especially when end grain is being trimmed. There are two pieces of flat wood fixed together, and the inner edge of the top piece is planed at a slight angle so that there is no danger of the plane removing shavings from it (see B).
The bottom corner is planed away at about 45 degrees to the extent of about 1/8 inch, the purpose of which is to form a dust trap. Dust collecting in the angle might easily throw the plane out of tmth. The stop is let into a groove about 3 ins. from the end, and it is screwed in. A good plan is to make both groove and stop slightly tapered so that a good driving fit can be made (A). It is the groove which holds the stop in position. The screws just prevent it from rising. Two or more cross battens should be screwed to the underside to prevent the board from warping.
We may now turn to the two uses of the board. In the first, that of trimming the ends of wood, since they must be square in both width and thickness, it is obvious that the wood must be held tightly up against the stop so that it is exactly at right angles with the plane. Furthermore, the sole of the plane must slide along the edge of the top board. The wood being trimmed is held against the stop with the left hand and a steady outward pressure maintained so that it is fed up to the plane. Fig. 1 shows the shooting board in use for this kind of work. Since it is generally end grain that is being planed, precautions have to be taken to prevent splitting out. One of these is to chisel off the back corner, but it often happens that this is impracticable because this would spoil the work. In this case the better plan is to put a spare piece of wood at the back of that being planed as shown in Fig. 1. If anything it should be slightly thicker, and it must obviously be perfectly parallel. Its back corner is chiselled off because the plane removes shavings from it as well as from the work. Its support effectively prevents the latter from splintering out.
Turning now to the second use of the board, that of making the edge straight and square, it is apparent that the stop merely answers the purpose of a stop only — that is, it simply holds the work still whilst the plane is being used. Its squareness is of little importance. Furthermore there is no need for the plane to be guided by the edge of the top part of the board. For one thing it is seldom practicable to hold the work up to the plane and to keep the latter against the edge at the same time, especially when large work is being dealt with. For another, there would be no advantage in doing so since one can feel the run of the plane much better when it bears against the work only.
It is treated in much the same way as when wood is planed in the vice, shavings being removed from the centre first.
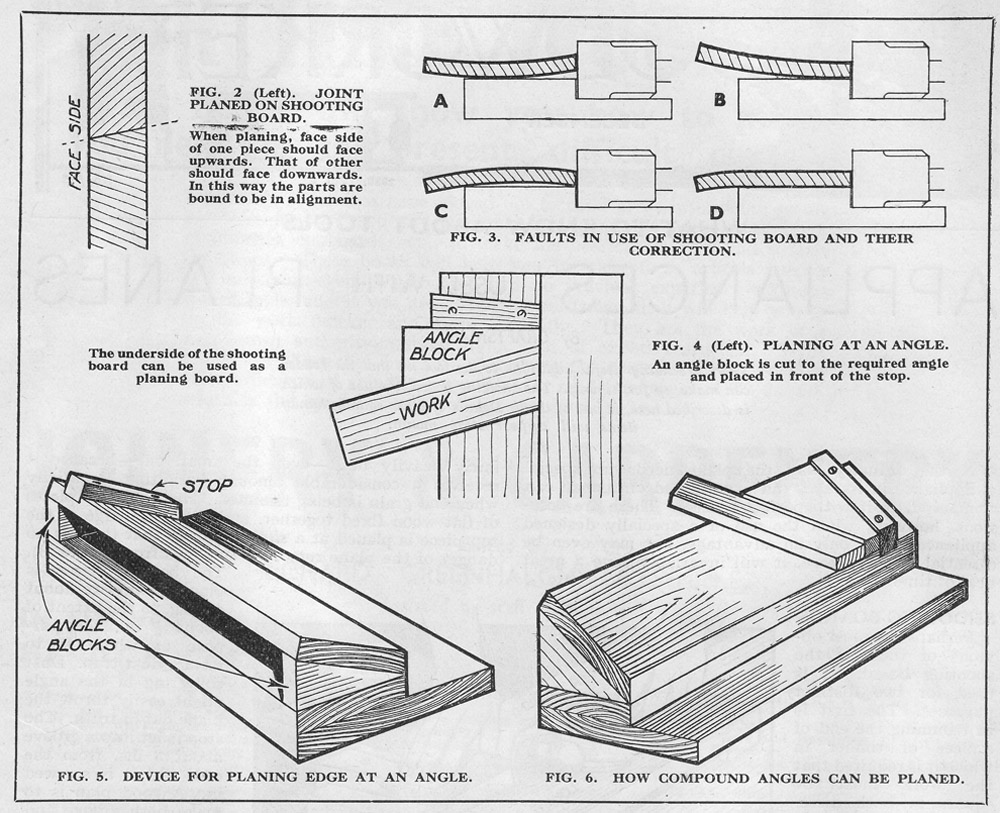
There is one point to note in the use of the shooting board for planing joints. Theoretically the edges should be planed square automatically so that the two parts of the joint should be in alignment when put together. As a practical matter this seldom happens. Possibly the side of the plane is not quite square with the sole, or maybe the board itself is not perfect. Whatever it is, it frequently happens that the edge is a trifle out of square, This, however, does not matter in the case of a joint if the simple precaution is taken of planing the one piece with the face side uppermost, and the other with the face side downwards. In this way the two angles cancel each other out so to speak as shown in Fig. 2.
It will be realised that the great advantage of the shooting board, apart from trimming ends, is in planing the edges of thin wood. If the latter were placed in the vice the plane would inevitably wobble when used, so that it would be extremely difficult to keep the edge square, especially if the wood were extra long. When the shooting board is used, the wood lies flat and the plane is supported on its side. The same obvious advantage maintains when veneer is being trimmed. In this case a flat batten is placed over the veneer to keep it flat and prevent buckling.
A pitfall to be avoided is when the wood has warped somewhat. It may throw the angle of the edge rather badly out. Fig. 3 explains the idea. At A the wood leaves board where the plane works so that the edge is bound to be at a false angle. It can be largely corrected by pressing the wood firmly down right at the edge as at B so that the plane sole really runs radially with the curve of board and is thus square.
At C the wood is hollow side downwards and once again the edge is necessarily out of square. The only method of correction is to press the work heavily down as at D. This flattens it and brings the plane square with the edge.
Sometimes it is necessary to trim the work at an angle other than a right angle. If this should be 45 degrees the mitre shooting board (to be discussed later) is used. For an odd angle, however, the best plan is to place a tapered block against the stop as shown in Fig. 4. The required angle is first planed and the stop then temporarily pinned in position. The pins serve merely to keep it still, the stress being taken by the stop. Any number of pieces can be trimmed to exactly the same angle.
If an edge has to be at an angle in its thickness the device shown in Fig. 5 can be used. A flat board is mounted upon two or more tapered blocks, and the whole thing fixed to the shooting board with screws. A stop must be fixed to one end in the usual way. It will be realised that a compound angle in which both the width and the thickness are at an angle can be planed by combining the two methods as shown in Fig. 6. ![]()
The Woodworker, Volume XLIII, Number 553 – December 1939
Last Updated: