DID YOU KNOW…
Stanley Tools made over 180 different models of handplanes in its heyday – many of which sold in the tens of millions. Many of them are common and found in most workshops across the world, while some are very rare indeed. If you need to find out some quick information about the collector value, manufacturing dates, sizes and features, then check out the “Stats Sheets” section for basic info on the entire range of Stanley handplanes.
Planemaking – Casting And Making An Iron Trying Plane
NOTE: Click on image to enlarge.
The following article is taken from the 1889 trade publication “Work” (Saturday, April 13, 1889 – Vol. 1, No. 4). It should be noted that it is unsure at this stage just who exactly “J. H.” may be, but they do seem to possess some interesting knowledge and insight into the casting process and planemaking in general. Articles like this, from the “Golden Age” of infill plane making — and indeed metal planemaking as a whole (after all this was the era in which Stanley Tools were kings amongst a plethora of other makers in the U.S.) are invaluable in helping to understand the artistry and craftsmanship of these makers and companies.
Home-Made Tools.
By J. H.
I. – An Iron Trying Plane
Introduction – Pattern For Stock – How To Make Pattern – Casting – Trueing Up Sole And Side – Filing – Fitting Wood Blocking – Plane Iron – Filing Mouth – Wedge – Polishing – Lever.
In this series of papers I propose to describe the construction of many of those common tools which, though more or less costly to purchase, amateurs can very well contrive to construct for their own use. There are many such in our workshops – tools which workmen themselves seldom think of purchasing, and which require no very great amount of skill in their construction, but chiefly considerable patience, and much care. I think it well, in the absence of a very strict classification, to divide these tools into four main sections, as follows : – first, planes; second, tools used in measurement; third, miscellaneous tools; fourth, general shop tools. This will be sufficient for our purpose, and in carrying out my plan, as indicated above, I shall keep this arrangement in view and follow it.
Let our first example be an iron trying plane, a tool which no wood worker who aspires to do the very best class of work can well afford to be without. Such a plane costs about thirty shillings in the shops, but can be made for ive shillings.
First, we want a pattern for the stock. This should be made of mahogany, planed very true and free from winding to a thickness of 3/16 inch. bare, say 1/64 inch bare. But keep the bottom of the plane full 3/16 inch, to have sufficient metal in case of posible curvature of the casting in cooling.
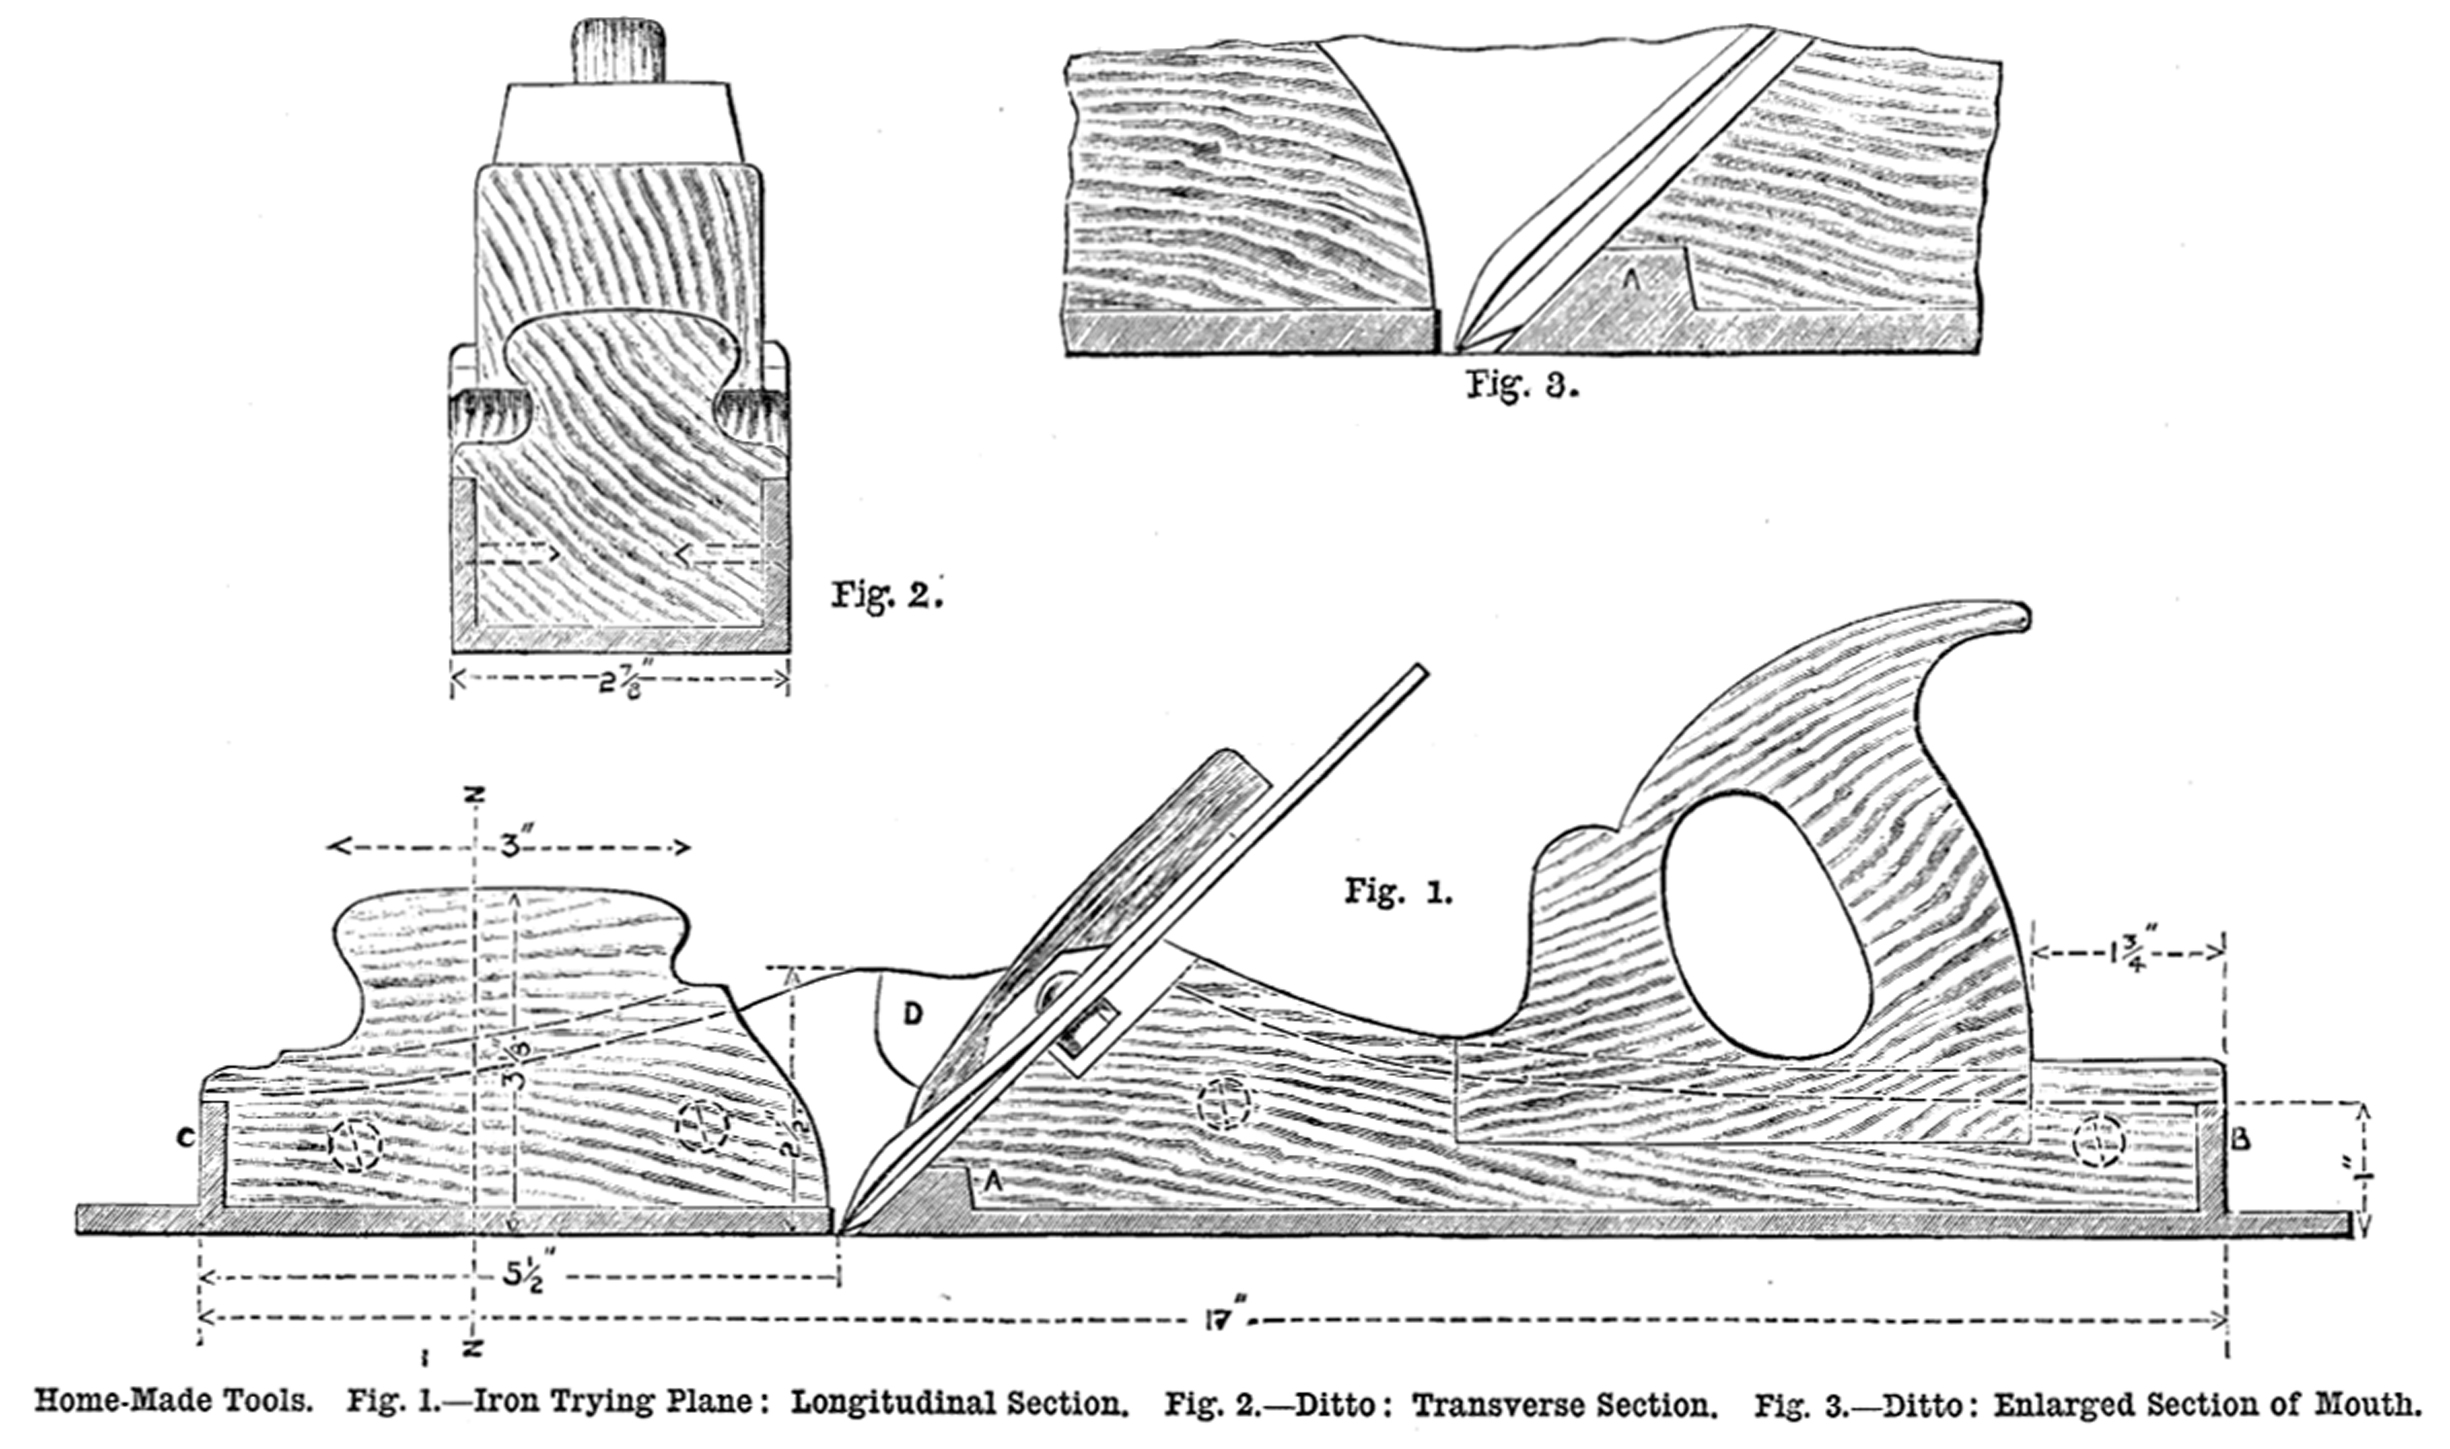
The shape of the pattern is seen in Figs. 1 and 2. The sides will be nailed on the bottom, perfectly square therewith, and the merest trifle of taper should be given to their inside faces, so that their thickness at the upper edge shall show slack by the callipers, when by comparison they are tight at the bottom edge. This taper is for clean delivery in moulding.
A strip, (A), is glued across the inside face of the bottom, just behind the mouth, to form a good bedding for the iron, and also as a shoulder for the abutment of the hinder piece of blocking; and two pieces, (B), (C), at back and front, to terminate and stiffen the ends, and to act as abutments for the blocking. Two pieces, (D), are fitted against the sides to take the resistance of the tightening wedge, if a wedge is used. If a lever is employed no such pieces will be required. These will not be fastened into the pattern, since they would then prevent delivery by pulling up the overlying sand in the mould. They must each be fitted with a vertical sliding dovetail, so that they will be left behind in the mould on the withdrawal of the main pattern. They are taken out subsequently sideways from the mould. Clean the pattern off with fine glass paper, varnish, and rub down.
Be careful to take the pattern to a foundry where soft and clean castings are made. A hard, rough casting will be quite useless for the purpose. Stipulate that if the surfaces show blowholes when filed or planed, that the casting shall be replaced free of cost. This precaution is necessary in order to guard against any loss that might otherwise be brought about through the occurrence of a defect of this kind which will sometimes happen in the process of casting.
The most difficult task now follows – that of trueing up the sole and sides of the casting. These, especially the sole, must be straight and free from winding. For use on the shooting board it is also necessary that the sides be truly at right angles therewith.
It will much facilitate matters if a light cut can be taken off all over in the planing machine. But to pay for planing would run up the cost of the plane by about ten shillings. Hence, in most instances, the amateur or cabinet maker will have to true the stock by filing only – not a very severe task after all, provided he is fairly skilful in the use of the file.
Briefly, then, remove the outside hard skin either by grinding, or with an old, nearly worn-out file. Having done so, take a bastard file and go all over the surfaces carefully until they are very approximately level. Their accuracy would be best test on a fitter’s surface plate, supposing the use of one can be obtained. But if not, then a steel straightedge of sufficient length will answer the purpose, trying the plane lengthways, crossways, and diagonally; the latter for winding. It is quite possible to use a very true mahogany straightedge for this purpose if a steel one is not available. As the later stages of filing are approached, the coincidence of the surfaces of the plane and of the surface plate, or straightedge, is carefully tested by smearing a thin film of red lead and oil made to a consistence of thin paste over the plate or straightedge, and observing the extent of its transference to the faces of the plane. Finer files will afterwards be used, finishing with a dead smooth file. Scraping is hardly necessary.
The most troublesome portion of the work is now accomplished. The next task is the fitting of the wood blocking. This blocking may be conventionally made of rosewood, beech, oak, or hard Honduras mahogany. Whatever wood is used it must be perfectly dry. It ought to have lain in the shop under the bench for two or three years at least. Then, being once fitted, there is no reasonable likelihood of shrinkage and splitting occurring.
The pieces may be fitted flush with the inside faces of the casting, or they may preferebly be shouldered over the edges and made flush with the outside faces. The latter plan is shown in Figs. 1 and 2. The fitting of the blocks into the interior and over the edges should be quite finished before the upper outlines are cut. No hard driving must be done, else the iron will probably become broken. Gentle tapping only must be given, and red lead or chalk may be rubbed over the iron to indicate where contact of the blocking occurs. When fitted, drill and countersink four holes in each side to secure the blocks in place perminently with wood screws. The hinder block will have a handle fitted into a mortise recessed therein, and the end which comes next the mouth will be bevelled to an angle of 45 degrees for the bedding of the iron. This bedding face must be very free from winding, else the iron will rock, and so cause the shavings to choke the mouth of the plane. The end of the front block will be bevelled back as shown for the clearance of the shavings.
At this stage it will be desirable to procure the iron, which should properly be a “gauged” or parallel iron, its wearing backwards by regrinding does not cause that enlargement of the mouth of the plane which occurs with the tapered iron.
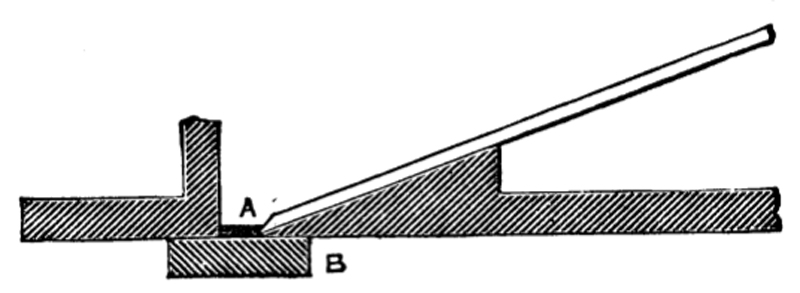
The filing of the mouth, about which I have said nothing, will be undertaken now that we suppose we have the iron bedded on its block, and both front and back blocks screwed in place, as shown. It must be filed, at both back and front edges, perfectly square with the edges of the plane, and with reference to its own iron and wedge, in such a manner that the slightest possible clearance opening for the shavings shall be permitted. See Fig. 3, showing a section of the mouth enlarged. The wedge is fitted at about the same time, the strips, (D), being filed underneath to make good contact.
With this, the essential work of the plane is completed, and the cleaning up with glass paper and the polishing only remains. If the wood is of light colour, staining will improve its appearance. The polishing not only adds to the beauty of the appearance of the tool, but also protects the wood to some extent from atmospheric influence.
The main points, then, to be regarded in the making of this plane are accuracy in the pattern, a soft, clean casting, free from blowholes, the selection of dry, hard wood for the blocking pieces, good fitting of the same, without such severe driving as would tend to break the casting, good bedding of the iron and wedge on its seat, and the most scrupulous nicety in the width of the mouth.
If we elect to use a lever instead of a wedge, the pieces, (D), in Fig. 1 are omitted, and the wedge is made of brass, cast from a pattern. It is pivoted, and tightened on the iron by means of a screw of coarse pitch and large, coarsely milled lead.
This method is preferable to the wedge, but involves more work and slightly more expense. In the next article, however, I will describe a smoothing plane fitted in this manner, and therefore give no details of such fitting here.
(To be continued.)
Thanks to Bugbear for sending me a copy of this old article.
Follow-Up Letters from readers at the time:
Pattern of Plane for Casting. — E. P. W. writes:
— “I have read the article on home-made planes, and I think it is my duty to mention that when a pattern is made for a casting, it should not be cut quite through, and there should be a thin piece glued or tacked on to the pattern where the mouth is to be, because it is difficult to have a clean casting when the mouth is cut through, and the part that forms the bed for the iron, being very thin, cools very quickly, and is sometimes so hard that a file will not touch it.
This will prevent it, and there will be no trouble in chipping or grinding the projection off, and then when the casting has been planed or filed up, as the case may be, the mouth will be through, and there will be no trouble. I hope the writer of the article will not be offended, as I do not write this to offend him, but for the benefit of any one that may be following his instructions, and be fixed, as I have been. I speak from experience.”
Pattern of Plane for Casting. — A Foreman Pattern Maker writes in reply to E. P. W.:
— “Though there is some advantage in casting a piece across the mouth of the plane, I do not think it at all necessary if soft Scotch iron is used. If inferior hard iron is employed, then it is well to thicken the metal. Actually the metal where the iron has to bed would not come to a keen or “feather edge” in any case, as that edge would be cut off in the pattern, and in addition there would be the allowance of extra thickness for planing on the bottom — say 1/16 inch or 3/32 inch. Then there is the strip cast across the inside face, to give the iron a bedding above the bevelled facet, and this keeps the metal rather hotter there than elsewhere, and so tends to prevent chilling. As a matter of fact all the outside surfaces of an iron plane are hard when they leave the mould, but such hardness is only skin deep, and is removed by grinding, previous to using the file. I may add also that I speak from experience, but admit, at the same time, that the class of metal used will have a vital influence on results. I particularly mentioned, however, soft castings in my article, page 50.”
Home-made Planes. — Bert writes:
— “Having been interested in the article on home-made planes and E. P. W.’s remarks, I think that he is quite right in his idea in having a piece over the mouth of the pattern. I have made two or three dozen of them myself. I am an iron moulder, and I find that to cast them with the mouth left open not only causes them to get hard but causes them to warp, being weak in the middle. And another thing I notice, the writer is very scanty with the taper, as most pattern makers are. He says the merest trifle will do.Now, I say it is not enough; if he wants a clean casting he should give a little more taper, then a moulder has a better chance to get his pattern out without shaking any of what we call the cod down — that is, the inside of the pattern — and if that is left intact he can depend on a good clean casting. I have taken WORK since the beginning, and I am very pleased with it. I see you mean to go in for all trades, but I have been wondering if you will go in for ours. I have taken in two or three journals, but none reached as far as that. If you could give a little about the working of a cupola, it would be very welcome to not only me, but some friends in the trade who take in WORK every week. I may add here that I succeeded in making a table of Mr. Adamson’s design in No. 1 of WORK. I hope that my suggestions will not be considered offensive.” ![]()
For Part II on Casting An Iron Smoothing Plane, click here.
For Part III on Casting An Iron Chariot Plane, click here.
For an article on Casting An Adjustable Block Plane, click here.
For an article on Casting An Iron Rebate Plane, click here.
Last Updated: