DID YOU KNOW…
Our aim is to make Handplane Central a valuable source of information for all types of handplanes, including wooden planes, infill planes and Stanley type planes.
If you want to make a woodworking plane we have a selection of plans for making planes and we’re adding new articles almost every day. So if you’re into planemaking, aspiring to be a planemaker, a hand plane collector or just want to learn about hand planes in general and how to use them then Handplane Central is a good place to start.
Truing The Soles Of Wooden Planes
This article has been transcribed from the book “Bench Work In Wood: A Course Of Study And Practice Designed For The Use Of Schools And Colleges” by the writer W.F.M. Goss. which was first printed by Ginn & Co, Boston in 1888. W.F.M. Goss was a professor of practical mechanics at Purdue University in Lafayette, Indiana at that time, and many of the illustrations in the book were produced by Mr. M. Golden, of the School of Mechanics and Engineering at the same institution.
Although the book is over a hundred years old, much of what is written in it is still valid today. Taking into account the advances in tool steel technology and the manufacture of some plastic-bodied planes, the development of hand planes has not changed much in that time. As far as blades were concerned it was still very much a matter of welding a more expensive steel cutting “edge” to a softer iron blade. This was due mainly to the fact that the “new” steels were quite expensive to buy on a tradesman’s wages, and many woodworkers were accustomed to using wooden planes rather than the newly developed Bailey planes – even with their thinner “all steel” blades and handy adjusters.
In this all-too-brief article, W.F.M. Goss goes through the process of truing up the sole of a wooden plane, with the emphasis on determining just where it is that needs attention and how to go about doing it. I separated this from the main article as I felt it provided some “stand-alone” tips in itself which I felt would be otherwise buried in a longer article.
 “To joint a plane, fasten it in a vice with the face up and the front end to the right. The iron should be in place, the cutting edge well back within the mouth, and the wedge driven as for work. It is now necessary to determine whether the plane to be jointed is twisted or not.
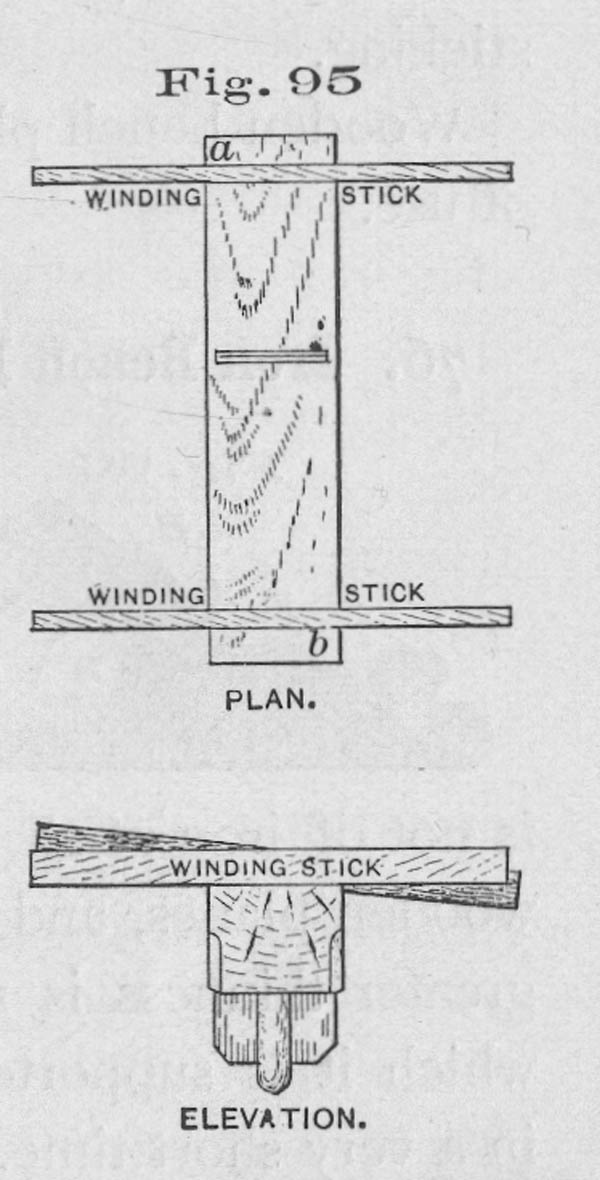
Apply two parallel strips, or “winding sticks”, (the longer legs of two framing-squares will answer), one across each end of the plane, as indicated by Fig, 95. After making sure that they are parallel, sight across one to the other. As the eye is lowered, if the one farther away is lost sight of all at the same time, the plane is “out of wind”, and needs only to be straightened; but, if one end of the straight-edge that is farther from the eye, disappears before its other end, as in the elevation, Fig. 95, it is evident that the two corners a and b, diagonally opposite, are high, and more must from them than from the other corners. With this understanding, the fore-plane or the jointer may be applied until the plane is jointed, that is, until the face is a true plane.
During the planing process, frequent tests must be made with the parallel strips, to make sure that the high corners are being brought down properly. In the early stages of the work, the try-square may be used occasionally to keep the face as nearly as may be at right angles to one side, and the straightness of the face may be determined either by sighting or by use of the framing-square as a straight-edge. A true face having been produced, the sharp edges between it and the two sides should be changed to slight chamfers, inasmuch as the sharp edges, if not removed, are likely to splinter off.
A few drops of lubricating oil rubbed on the newly-planed surface, will prevent wear and keep shavings from sticking.”