DID YOU KNOW…
Just starting out with handplanes? Don’t know the difference between a block plane and a jointer? Confused about jacks, smoothers and fores? Fear not! Handplane Central has information on the different types of planes, what they look like and how to use them. We also have articles on how to choose a hand plane and exactly what you need to know beforehand. From the bare bones basic kit right up to the complete workshop, what planes are luxuries and what planes you just can’t do without!
We also feature the occasional handplane review, along tips and tricks on general handplane use and what accessories are available. So before you go anywhere else, check out what we have to offer on Handplane Central.
A Simple Dowel Grooving Plane
It is always necessary to groove a dowel to prevent the glue from splitting the wood as the dowel is knocked in.
Every woodworker knows that the action of a glued piece of dowel when forced into its hole not unlike that of a piston rod in its casing There must be an “escape” valve in the form of a groove in the dowel otherwise a pocket of air and surplus glue will prevent it from being driven home properly. If great pressure is applied the wood is liable to split.
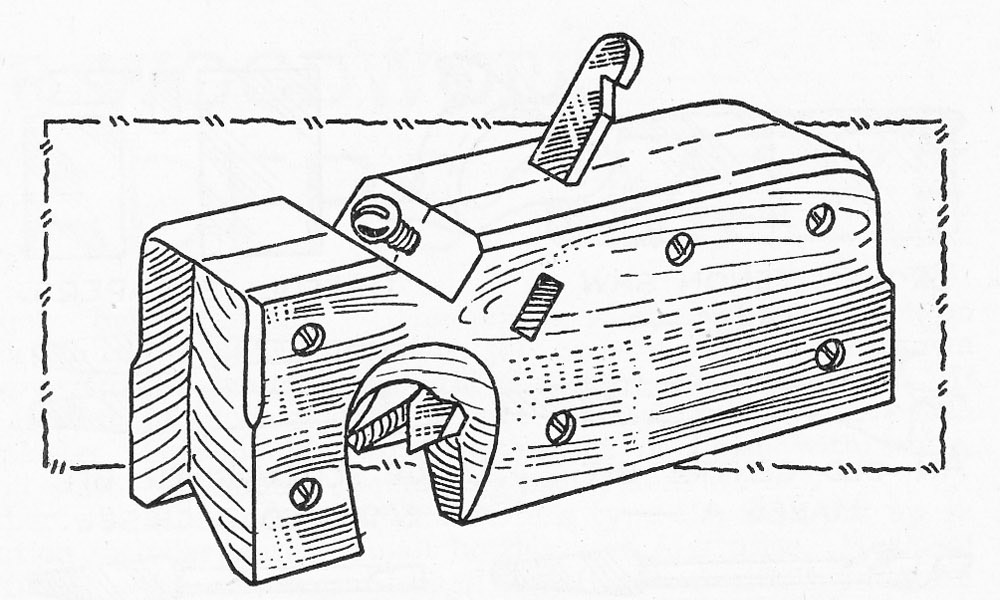
When there is no groovmg implement available we are tempted to knock in the dowels just as they are and so run the risk of bad joints and bad splits. The small groovmg plane illustrated in Fig. 1 is easily made from odds and ends and will groove dowels from 1/4 inch diameter to 2 inch diameter.
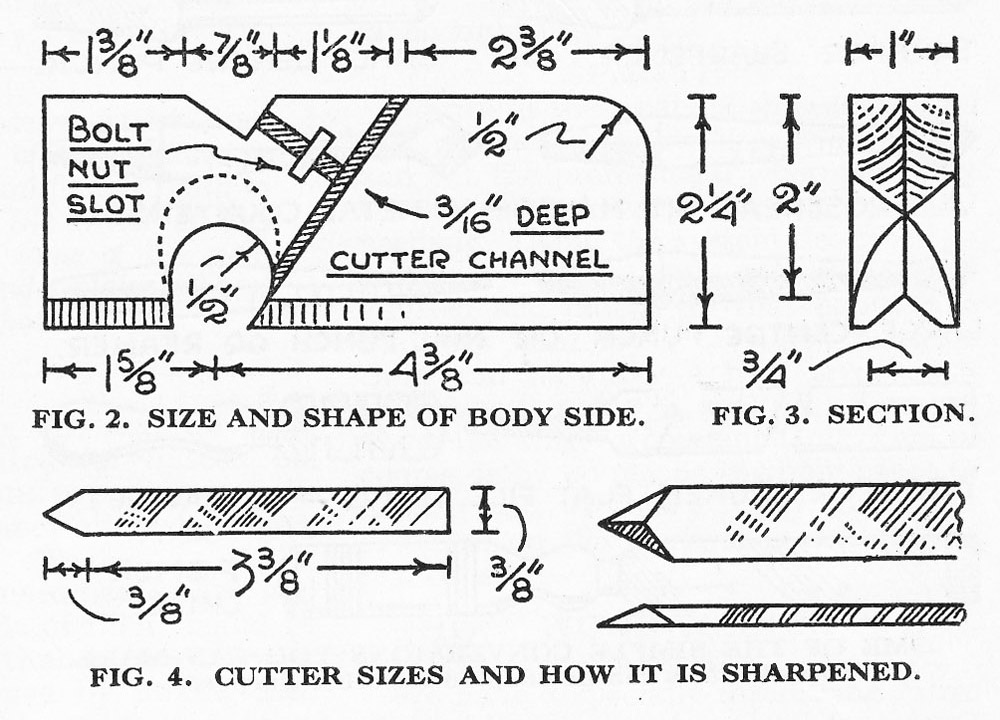
The body consists of two 1/2 inch thick sides, a right and a left, identical in every way. Fig. 2 shows how the joining sides are grooved for the steel cutter and an adjusting bolt and these should be obtained to get the correct measurements.
For the steel cutter, which is ground and sharpened as shown in Fig. 4, one could use the broken blade of a 3/8 inch or a 1/2 inch firmer chisel. The roundhead iron machine bolt required is about 1-1/2 inches long by 1/4 inch thick, the nut being 1/2 inch square.
The body parts are screwed together as in Fig. 1 and the slots and other places trimmed. The mouth of the plane is scalloped with a gouge and rasped and glass-papered. This results in a pointed “roof” to the mouth which throws the shavmgs to either side (see sectional view at Fig. 3); otherwise they are apt to “pack” themselves in the aperture.
The bolt nut, which must be square and fitting neatly into the slot provided, is now inserted and held in place by the bolt which is screwed in. The cutter is, in turn, held by the bolt. The top end of the cutter could be nicked to facilitate removal.
This simple little dowel groovmg plane was made from 1/2 inch plywood and such materlal is recommended, although plain oak and other hardwoods will serve. The plane is not intended to groove very short lengths of dowelling – only full 3 foot lengths, this being more convenient and time saving.
Owing to the fact that the grain of most dowels is rather “cross” in places, the cutter should be adjusted to the minimum. Some workers plane a single groove up the dowels, but it is best to be on the safe side and run two grooves, one opposite the other. ![]()
The Woodworker, Volume XLIV, Number 556 – March 1940
NOTE: A small blade from a plow, grooving or combination plane (such as a Stanley No. 50 or a Record No. 044) can also be shaped and used as a cutter for this plane.
Last Updated: