DID YOU KNOW…
Just starting out with handplanes? Don’t know the difference between a block plane and a jointer? Confused about jacks, smoothers and fores? Fear not! Handplane Central has information on the different types of planes, what they look like and how to use them. We also have articles on how to choose a hand plane and exactly what you need to know beforehand. From the bare bones basic kit right up to the complete workshop, what planes are luxuries and what planes you just can’t do without!
We also feature the occasional handplane review, along tips and tricks on general handplane use and what accessories are available. So before you go anywhere else, check out what we have to offer on Handplane Central.
Practical Plane Making (Part III)
Practical Planemaking 3
By W. J. Armour
Stop Work: the Plough
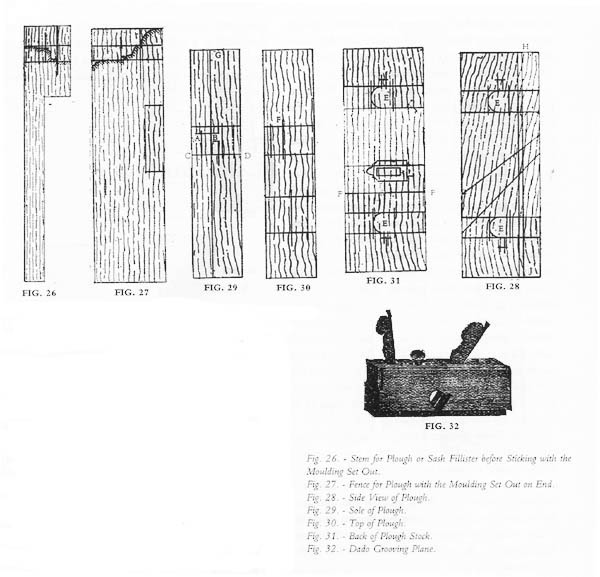 Ploughs are generally made in lots of from three to six; the reason is that the mouldings on the ends of the stems and fences are stuck together, and could not be stuck so correctly if done singly. First cut out the stems to shape as shown in Fig. 26, and plane them down in a block to the thickness of the stem hole in the plough stock; wedge them in a block with the moulding set out on the side of each one, and stick the moulding. Next cut out the fences (Fig. 27) to a size 9 1/2 in. in length by 2 1/8 in. by 2 1/2 in., and plane up square; wedge up in a block, and stick the ends to a moulding set out on the side of each end one.
Next get out the wood for the stock (Fig. 28), and plane up 1 3/4 in. by 2 3/4 in. and 8 in. long; measure from the fore end 3 in. on the sole (Fig. 29) for the front of mouth A B, and from this line 5/8 in. for the bed line C D. From the line C D strike the pitch of bed, and from this line measure on the top (Fig. 30) 1 1/4 in. and draw a line on side to mouth line; then gauge from the back 3/4 in. on top and bottom, and another line 5/8 in., draw two lines 3/4 in. apart, and carry them with the square round to the other side for the stem holes E, taking care that they are correctly drawn, otherwise the stems will be in winding. Then gauge from the sole of plough stock across the side lines of stem holes 1 1/8 in.; this is the bottom of stem hole and gauge for the depth of stem hole; from the centre of this square with the compasses strike a semicircle. This gives the shape of stem hole. ?Measure from the fore end on the back 2 3/4 in., draw a line ( F F, Fig. 31) across the back of plough stop for the stop mortise, place the barrel of stop to this line for the size of the mortise, and carry this line across the bottom and top. Then measure from the back of stock 1/4 in., and gauge top and bottom; place the narrow part of stop on this line and gauge for the thickness. Gauge from the back on the sole 1 in. (G H, Fig. 29) – this is the line where the plate beds on to; and from the sole gauge 9/16 in. on the side (H J, Fig. 28) – this is the size of the rebate which is taken out for the plate. From this line gauge 3/16 in. to the depth of groove for the plate. Care must be taken not to go through the line, and the plate must be in the centre of the mortise.
Having now got the stock set out, bore the stem holes with a 3/4-in. centre-bit, pare with a chisel and gouge clean just a shade hollow. Then let in the stems, using the hollow plane for the top of stems, and drive in tight. Next bore the mortise with a 3/8-in. nose-bit, and rough out with a saw float; then use the side float and clean perfectly through to the lines, using a topping float or chisel for top and bed. Next let in the stop tight, screw in the thumbscrew of stop, and scribe for the top plate and shoe, which must next be let in. Then place the side brass with the slot (I, Fig. 31) on the line of stop on the side, scribe round, and let in. Then bore the slot for the side screw to work. This completes the fittings of the stock.
Next take out the rebate for the plate and groove with a grooving-plane for the plates, which are let in the groove tight. Bring the hind plate to a level with the bed line of mortise. In looking down the mortise the bottom of plate should be raised a little so as to fit into the deeper part of the groove at the bottom of the cutting iron. Having got the back plate in the proper place, bore through the holes of the plate for rivets, fit tight, and rivet. Let the edge in and bed the irons; see that the irons are all the same thickness, otherwise the same wedge will not do for all of them; fit the front plate to the iron for the size of mouth, bore for rivets, and rivet up tight. The stock must now be trimmed and cleaned ready for the stems to knock in, after they have been riveted to the fence.
Dado Grooving Plane
Dados are planes used to cut grooves across the grain, such as bookcase shelves, etc. Fig. 32 is a perspective view of one of these planes; Fig. 33 shows the top, Fig. 34 the side, and Fig. 35 the sole. They are made in the shape of rebate planes, with a double tooth of iron in front to cut the grain; and they have a movable stop to gauge the distance down. The 1/2-in. size will be taken by way of example.
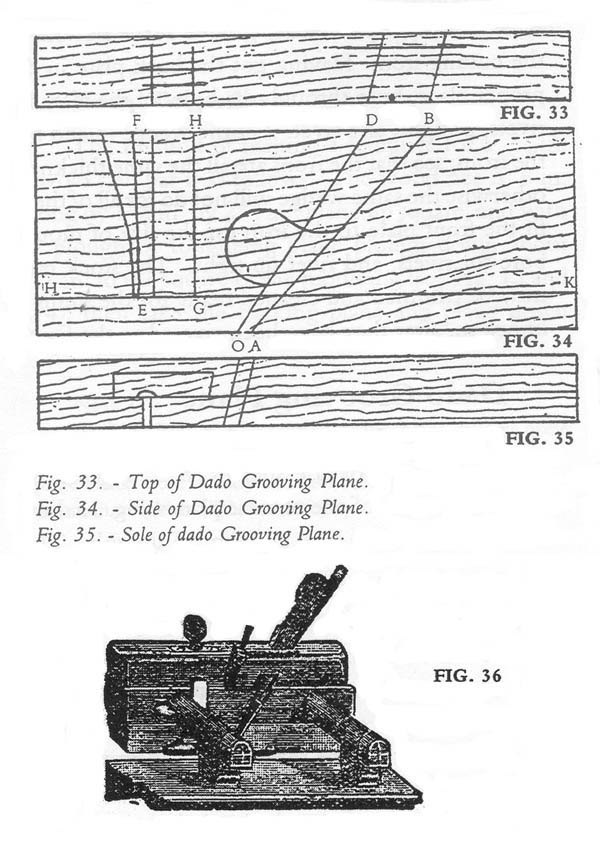 Plane up square a piece of wood 9 1/2 in. by 1 1/8 in. by 3 1/2 in., measure on the sole (Fig. 35) from the fore end 3 7/8 in. for bed line (this is the same skew as the rebate plane), and strike the pitch A B. Next strike the mouth line C D and carry it to the top give the size of mortise; measure from the side of plane (Fig. 33) 1/2 in. for the back of mortise, and, with the gauge, mark on the sole the same mark for the width of groove as in all sizes of grooving planes; the back of mortise is level with the size of the groove wanted, so that the iron stands straight in the plane, as the iron is to cut at each side of the groove. Halve the size on top from the back of mortise line and gauge for the width of mortise. Strike the shape of eye-hole, measure from the fore end for the tooth 2 in., and strike a line at right angles (E F, Fig. 34), as the tooth stands perpendicular; measure G H 2 5/8 in. from the fore end for stop mortise and gauge for size of stop, as in a plough; then measure from the back H K 5/8 in. for the rebate for the shoe of stop.
In all dados the same size is used for the stop rebate, and all are the same distance from the sole down, 5/8 in.; the setting out is now completed. Next cut in the mouth, knock out the core, bore for mortise, clean out with floats, pare the bed, and float down true; then cut out the eye-hole and clean; let in the wedge, let in the stop, and take out the rebate. After letting in the tooth, let in the stop and scribe for shoe and top plate, which is let in flush with the bottom of rebate. In filing in the iron be sure that the tooth is a trifle fuller than the cutting iron, otherwise it will be of no use to cut the grain; then harden the irons, tooth and bed, clean the plane, and trim.
Click here for Practical Plane Making (Part IV)
Part I | Part II | Part III | Part IV