DID YOU KNOW…
Making planes can be a difficult task, but the most difficult part is actually finding good information on planemaking and how to go about it. Handplane Central simplifies the process somewhat by providing a wealth of information and various tips and tricks on making planes, as well as the tools and materials necessary for planemaking (and how to make the plane making tools themselves in some instances).
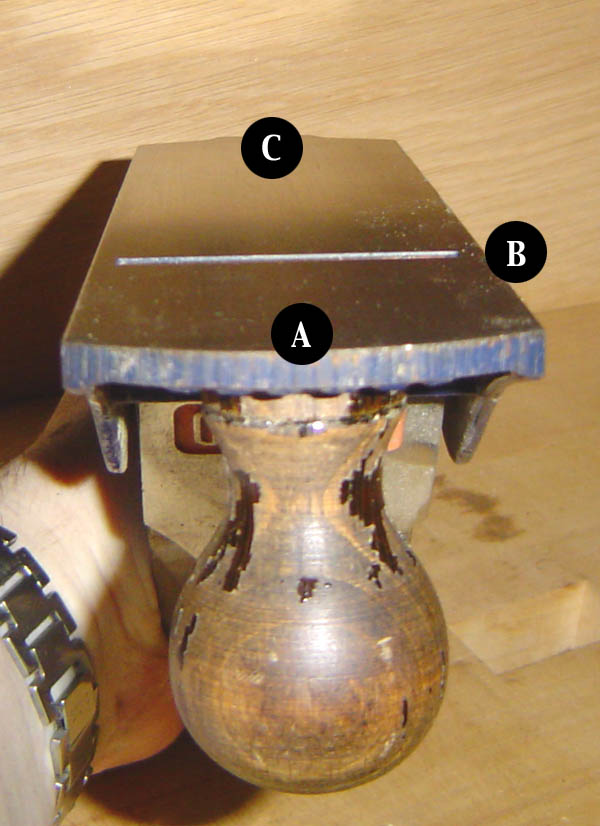
Thoughts On Hand Plane Sole Flatness
 It should be said that almost all hand planes on the market will need some adjustment and a little attention, when you get them home from the store, in order to make them truly sing. Any plane will be made better by a little fettling here or there. As far as plane soles being perfectly flat go, however, you do have a little leeway. While many of us who have been taught in high school, trade school or on-the-job to keep the soles of our planes flat, in actual fact the reality is that the entire sole does not have to be completely and perfectly flat for the plane to work properly.
There are really only three points on the sole that need to be in true alignment for the plane to work well; the toe, the mouth area and the heel. All points in between are not as crucial and, regardless of whether they are perfectly flat or only flat in those three critical contact points, there is little or no difference in actual performance. Much of the available literature on the subject advocates both methods – perfectly flat or flat at three points. Indeed the writer of one “Fine Woodworking” article even suggests relieving the sole of a plane with a ball mill to cut down on friction! While I personally would not go this far with my own planes I have no real problem with this concept.
To understand how the three points on the planes sole work, consider this:
You place the toe, or front, of the plane on a board ready for edging. We’ll call this position (A). Position (B) is at the mouth of the plane, say 1/2 inch in front of the blade extending to 1/2 inch behind it. Position (C) is at the heel, or the back, of the plane. Positions (A), (B) and (C) are dead flat – relative to each other. By this I mean that there is no light shining through at all when you place a straight- edge across them at these points. The spaces between positions (A) and (B), and (B) and (C) are hollow, for the example of this exercise, by 1/16 inch – this is from a side-on look. The length of the plane is irrelivant for the time being.
Position (A) is on the end of the board. You push the plane forward, keeping pressure down on the front of it, until it does indeed begin to dip down by 1/16 inch. This continues on until the end of the board comes in contact with the first 1/2 inch of position (B). There are now two completely flat reference points that are, in turn, bridged by the hollow.
Now the blade comes in contact with the timber and shaves a portion of it away. At this stage it doesn’t matter whether or not the entire area between position (A) and position (B) is completely flat because it’s really only the two points (A) & (B) that have any influence at all.
Now from here on in it starts to get a bit tricky. While positions (A) and (B) are nice and flat in relation to each other, poor position (C) is still in the same flat plane but is now minus the thickness of the shaving and therefore will hang above the board by that thickness.
 We compensate this by exerting a little more pressure on the back of the plane, as we continue on, and a little less on the front. This is not necessarily the thickness of the shaving, but something in between positions (A), (B) and (C). This can be worked out by some reasonably complicated geometry if one cares to get into it.
It is therefore at this point where we, the user, have the greatest influence on how good the finished surface will be, however one thing’s for sure – it will almost never be completely flat and “in plane” from end to end. There will always be at least some discrepancy – even if it’s only microns. Modern jointers ( the noisey, motorised ones ) compensate for this difference by having an adjustable infeed table (which, if you were to transfer this to the handplane, would actually affect positions (B) and (C) the most by allowing for the thickness of the shaving). Of course other factors can come into play from time to time but essentially that’s how it all works.
One thing I must add, also, is that I’m referring to a plane that is hollow, from front to back, between points (A), (B) and (C), and not one that is twisted so much that contact is not consistantly made across the full width of the points. If it is not across the full width at those points of course the plane itself will rock from side to side, and therefore will negate everything I’ve talked about.
Also, check out Stanley’s # 340 Furring Plane if you want to see a really radical approach to sole relieving. This plane is designed for very rough work prior to using bench planes, and in the case of this plane, positions (B) and (C) are the important ones. It sure does work well for roughing out, although the price is a bit steep for most people at around $900 to $1600!
On the subject of plane length: Once again it’s the distance between the points that makes a difference. A #4 smooth plane will tend to ride up and down between the high spots whereas the (A), (B) and (C) positions on a # 8 jointer plane will be further apart and therefore have a better chance of averaging out many of the high spots. Positions (A) and (B), and (B) and (C) are more important on a #8 for jointing, rather than they are for a #4, which is used for an entirely different purpose (spot removal). The emphasis of the positions on a block plane is also different as it’s mainly used for trimming. In this case positions (A) and (B) are not quite as important as positions (B) and (C), hence the very short distance between (A) and (B). And then of course there’s the bullnose plane, and the Stanley #97 chisel edge plane, as well as…………Well, you get the picture by now.
Having said all of that, if you truly want flat soles for your hand planes then, by all means, flatten them. The way we feel about tools is almost as important as anything else, and the time taken in truing a sole will not be wasted – even if it just makes us feel better in knowing that we have a truly flat sole.